Well it doesn't keep time for a start, which is an issue.
So I dug out the TNAC (Thermal Nuclear Alarm Clock) from under the bed after 8+ years, and to my amazement, it was (nearly) the correct time!
But then it soon became apparent that all was not well. It seemed to be having issues keeping time and the backup battery had long since died.
So I decided to give it an upgrade. Inside was a Basic stamp that I had pushed to it's limits. Connected to that was a horrific wiring nightmare controlling several solid state sound recorder chips, and an MP3 player from Woolworths.
|
So, I stuck an Arduino Mega 2560p inside. Not a fan of Arduino's any more, but I had loads of them lying around.
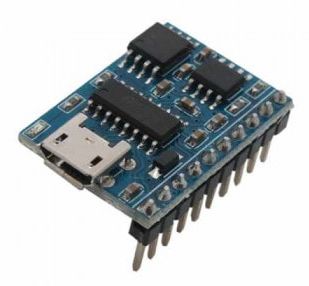
Onto this I attached a JQ8400 serial MP3 module (brilliant little things) and a new PCB to control the load of the lighting etc. I removed the temperamental blue LEDs that used to strobe around the top cage, and replaced them with RGB LEDs. Far more adaptable. The old unit had a very janky wireless controller. So I fitted a HC-06 Bluetooth module, so that I could control the system from my phone. Android MIT App inventor 2 is a great, free way to make your own applications. It has some quirks, and what you see on the screen isn't what you get on your phone, but you soon get your head around it. One of the main issues I had was theMP3 module. It has onboard flash memory, which I used for the sound effects. But there is also a USB port. This is very handy, as I can mount a remote USB stick outside the chassis and store the music and alarm sounds on this. BUT... it's very noisy. I had to 3d print a USB socket mount and make a remote USB lead that I could heavily suppress with capacitors. Otherwise, there is a substantial power 'click' through the speakers when you access the USB stick. The MP3 module is a bit quirky, but as long as you sort the files into the correct order using Drivesort.exe (which is free online), you are golden. |

|
|
The MP3 module will play the tracks in the order they are on the USB stick, not by filename.
What I mean by that is, if you number the track names. it's irrelevant. Track 1 is the first on the memory stick, not the track called 01. If you don't sort and save the USB stick, it will not play them in the order you view them in Windows Explorer. Setting up the MP3 module is simple. Connect to it using a standard Serial link. Then for example: |
Serial1.write(0xAA);Serial1.write(0x0B);Serial1.write(0x01);Serial1.write(0x02);Serial1.write(0xB8); // Select the Flash memory as the drive for sound files
delay(200);
Serial1.write(0xAA);Serial1.write(0x04);Serial1.write(0x00);Serial1.write(0xAE); // Stop all music files
delay(200);
Checksum=208; // Checksum=190+volume level
Serial1.write(0xAA);Serial1.write(0x13);Serial1.write(0x01);Serial1.write(25);Serial1.write(Checksum); // Set the volume to 25 ( Can be 0-31)
delay(200);
Checksum=179+Graphic;
Serial1.write(0xAA);Serial1.write(0xA1);Serial1.write(0x01);Serial1.write(Graphic);Serial1.write(Checksum); // Set the graphic equaliser mode
delay(200);
Checksum=190;
Serial1.write(0xAA);Serial1.write(0x07);Serial1.write(0x02); Serial1.write(0x00);Serial1.write(11);Serial1.write(Checksum);
// Plays track 11 Checksum is 179+the track number
delay(2000);
Serial1.write(0xAA);Serial1.write(0x0B);Serial1.write(0x01);Serial1.write(0x00);Serial1.write(0xB6); // Select USB as the drive for sound files
delay(200);
Checksum=179+AlarmSFX;
Serial1.write(0xAA);Serial1.write(0x07);Serial1.write(0x02); Serial1.write(0x00);Serial1.write(AlarmSFX);Serial1.write(Checksum);
// Play the track number 'AlarmSFX' This can be 1 or above. So track 1 checksum=180, track 10 checksum will be 189 etc.
delay(2000);
delay(200);
Serial1.write(0xAA);Serial1.write(0x04);Serial1.write(0x00);Serial1.write(0xAE); // Stop all music files
delay(200);
Checksum=208; // Checksum=190+volume level
Serial1.write(0xAA);Serial1.write(0x13);Serial1.write(0x01);Serial1.write(25);Serial1.write(Checksum); // Set the volume to 25 ( Can be 0-31)
delay(200);
Checksum=179+Graphic;
Serial1.write(0xAA);Serial1.write(0xA1);Serial1.write(0x01);Serial1.write(Graphic);Serial1.write(Checksum); // Set the graphic equaliser mode
delay(200);
Checksum=190;
Serial1.write(0xAA);Serial1.write(0x07);Serial1.write(0x02); Serial1.write(0x00);Serial1.write(11);Serial1.write(Checksum);
// Plays track 11 Checksum is 179+the track number
delay(2000);
Serial1.write(0xAA);Serial1.write(0x0B);Serial1.write(0x01);Serial1.write(0x00);Serial1.write(0xB6); // Select USB as the drive for sound files
delay(200);
Checksum=179+AlarmSFX;
Serial1.write(0xAA);Serial1.write(0x07);Serial1.write(0x02); Serial1.write(0x00);Serial1.write(AlarmSFX);Serial1.write(Checksum);
// Play the track number 'AlarmSFX' This can be 1 or above. So track 1 checksum=180, track 10 checksum will be 189 etc.
delay(2000);
|
The checksum must always equal the sum of the previous commands. It's pretty easy to work out from the datasheet.
|
| ||
I didn't change the MAX7219 multiplexer display drivers. I would have liked to, but that would have meant ripping the entire thing apart.
They did prove to be a bit temperamental on the I2C bus with the noise of the relays and the halogen lighting.
They did prove to be a bit temperamental on the I2C bus with the noise of the relays and the halogen lighting.

|
I built a stand for it this time, as it used to balance precariously on its metal base.
The frame is a simple rocket fin design, and I made some 3d printed sprung latches that move inwards after you have inserted the device. These grab the base and support it. Used my usual guy on Ebay to print me off some replacement TNAC graphics. These vinyl images really do finish it off nice and were less than £5. I also fitted a reset function key to the front. |
This is simply a 9 way 'D' plug with a couple of push buttons on it.
Press the red illuminated button, and you reset the alarm clock to it's defaults.
Press the smaller button underneath, and it performs a complete reboot. This was useful when troubleshooting.
Press the red illuminated button, and you reset the alarm clock to it's defaults.
Press the smaller button underneath, and it performs a complete reboot. This was useful when troubleshooting.
|
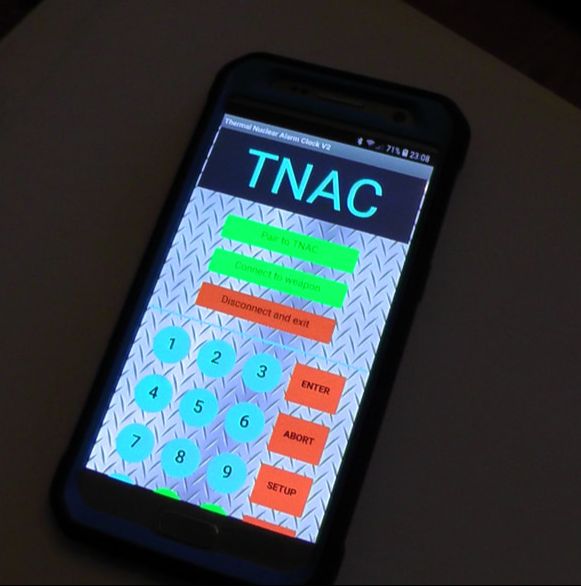
The Android app is pretty straightforward.
It is basically a carbon copy of the alarm clock control panel. I did contemplate making it a two way communications affair, so that I could have the time, date etc on the phone. Then thought better of it. It's Bluetooth... I won't be arming it from 3 miles away. It simply sends out decimal 255 first, and then a number correlating to the button you pressed. The 255 is the error checking. Without that arriving first, it ignores the command. When you start using the app, the alarm clock logs that you are now using the phone and that takes priority (a boolean flag is set within the code). Than flag is only unset when you leave the app and it sends 255, followed by 254. |
|